Showing posts with label Blogging. Show all posts

How To Setup a Custom Domain On Blogger In 3 Simple Steps

You can easily setup a custom domain on Blogger, whether you get it from Blogger or some other domain host.

1-Where you should register a custom domain?

The thing is, that there are so many domain host around. Ill list the best one here which i believe provide the best domain hosting services. Notice that if you can't get one online through credit card, you can always get one locally. You just need to consider those which provide free DNS controls along the domain hosting. Normally most of them provide free DNS settings control panel but still one can except the odd ones.

After you will register your domain through the form on any domain host's website, you need to setup the DNS (domain name settings) for your domain. So its not like, registering the name and applying it directly to the Blogger Publishing pannel. (I'll explain that later in the post).
2-What to do with DNS?

Now that you register through the online registration forms of the domain hosts, you will get an email where they will send you the required User ID and Password to login to your domain control panel.
The procedure is almost the same with all the domain registrars except that they might call a specific option in a different way. We will deal with that.

Ok, so once you get into the control panel, you need to find a tab where it says DNS settings or something related to DNS.

Note that we are not their affiliates that we are promoting them. Its simply to give you an idea of the control panel. Hope it helps you out.

I will attach a little video tutorial so that you get a clear idea of the control panel. Once you are in the DNS settings, you need to setup something called 'CName'. You will find a tab or button related to that in the DNS settings. Click that and go to the link where it says 'Add new' or something related. We just want to add a new CName for our domain.
Settings:

You have to enter

'www'
where it asks for Name/subdomain (depends on what the host calls it) and
ghs.google.com where it asks for value/target host/destination/record. 'ghs' stands for Google Hosting Service. As your blog is Blogger Hosted (free hosting) you need to enter the host address. If your blog is hosted with some other company like 'Hostgator' your value would be different.

Now that its done, click save. It will take around 1-2 day (normally takes less than a day) to activate your DNS settings.

How will you know that your DNS is activated?
You will know this when you go to the next step, i.e adding our domain to Blogger Settings. It will give error if the DNS is not activated. (It may say: domain is not setup properly or the domain is just bought)


3-Setting up custom domain in Blogger Settings

Ok so now that our blog is ready to be added to Blogger's Settings panel, you have to go to Dashboard >> Settings >> Publishing.


Now go to custom domain >> Switch to advance settings. If you bought the custom domain from Blogger you don't need to go to the advance settings and you simply had to set it up from custom domain panel.


You need to enter your domain name as follows in 'Your Domain' field.

www.yourdomainname.com
Important part is the sub domain that is (third level sub domain www). If you would not enter www and just enter yourdomainname.com Blogger will give you error.

Now tick the redirect box and save changes. It will take around 6-7 hours for the redirection to complete.
My redirection was complete in less than 3 hours.

That's all!. Hope that was helpful. For any problems that you face, leave out the your comment below.

How To Add Custom Domain To Blogger


Blogger has already introduced custom domain name. If you purchase a domain name through Blogger, there’s no issue in setting it up because Blogger automatically configures CNAME. However if you purchased the domain name separately, you have to manually configure it. This post I’m going to show you how to host your own domain name on Blogger.


Mainly you have to follow 4 major steps, they are:
  1. Adding custom domain on Blogger
  2. Getting your domain ownership verification token
  3. Change DNS (Domain Name System) settings
  4. Verifying Domain name ownership on Blogger
If you don’t have a Blogger account first you have to create it, if you have a Google account you already have a Blogger account, so just log-in to Blogger.

Step 1: Adding custom domain on Blogger

  1. Go to http://www.blogger.com/.
  2. Now if you already have a blog, select which blog should use the new custom domain name
  3. Go to your selected blog “Settings > Basic”.blogger settings
  4. Under the “Publishing” click “Add custom domain”.add custom domain
  5. Now in the “Advanced settings” type your new domain name URL.custom domain name
  6. Click “Save” button. Then blogger display this error “We have not been able to verify your authority to this domain. Error 12. Please follow the settings instructions.”
  7. Click “settings instructions”. If you click this link before that error (above), you can’t configure CNAME correctly.

Step 2: Getting your domain ownership verification token

  1. Now you will be redirected to the “How do I use a custom domain name for my blog?” page.
  2. On this page, tick the “On a top-level domain (www.example.com).” option.host location
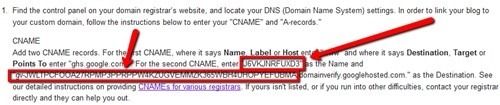
  3. Once you’ve chosen an option, setup instructions appear. At the beginning of the instructions you should see something similar to the screenshot below.cname ownership verification codePay attention to a pair of two codes highlighted in the screenshot. Those are your domain ownership token. In my example the codes are “J6VKJNRFUXD3" and “gv-JWLTPCFOOA27RPMP3PPRPPW4KZUGVEMMZK365WBH4UHOPYEFUBMA.domainverify.googlehosted.com.”. Your token will be different

Step 3: Change DNS settings


  1. Go to your domain name registrar’s “DNS console” panel and log-in.
  2. Navigate to the “Host Records” click edit.
  3. Add a CNAME.
    • For Host Name/Name/Label or Host” field, enter “www” without quotes and
    • For Address/Destination/Target or Points To field, enter “ghs.google.com” without the quotes.
  4. Now add another CNAME. This is for domain ownership verification. 
    • In the Host Name field, paste the first code you get in step 2.3, ex: J6VKJNRFUXD3.
    • In the Destination field, paste the second code, ex: “gv-JWLTPCFOOA27RPMP3PPRPPW4KZUGVEMMZK365WBH4UHOPYEFUBMA.domainverify.googlehosted.com.”.
    (Use your own codes generated in step 2.3, don’t use these two codes).
  5. Now we should add “A-records”. If you already have “A-records” modify them. If you don’t have them click “Add” button.
  6. You have to add 4 separate “A-records” , pointing to the following Google IP addresses:
    • 216.239.32.21
    • 216.239.34.21
    • 216.239.36.21
    • 216.239.38.21
Enter each IP into a “Address” field. In the corresponding “Host Name” field, enter your domain’s naked URL (without “www”, e.g example.com).

 In Case Of "Net4.in" Setup Will Like This...
Finally click “Save” button and wait for a few minutes to update all your domain settings.

Step 4: Update your Blogger settings

  1. Now go back to “Settings > Basic > Publishing” on Blogger and again enter your custom domain name with “www”.
  2. Ticks “redirect” option.
  3. Finally click “Save” button. If it again displays “Unable to verify authority….” Error waits for a few hours to update your DNS settings and again adds your domain name. No need to follow Host Records modifications. Just add domain name to Blogger publishing section.
  4. That’s, now your blog has a custom domain name.

Blogger: How to Link My Custom Domain to Blogger

If you have registered your own custom domain name but would rather use a free blog hosting service, then open an account with a Web hosting company and you can link your domain with your blog on Google's free Blogger service. By linking your domain name to your Blogger account, visitors can read your blog by typing your domain name rather than (account name).blogger.com. This is not only convenient, but it also adds a touch of professionalism to your free blog.


There are basically three steps involved in using your own domain name with your Blogger or Blogspot account:
1) Register or Transfer a domain of your choice.
For an existing domain you can either keep your existing registrar and just delegate your nameservers here, or move your domain's DNS and Registrar over to easyDNS. New domains are activated instantly, so you can go straight to Step 2 after add your domain.
2) Setup Your Blogger Account to recgonize your domain name.
Log into your blogger account and go into Settings -> Publishing and switch to "Custom Domain" and enter your own domain name. Don't forget to click on "Save Settings".
3) Enter your DNS settings here in your members' panel
When you log into your members' panel you click on the Domains link in the left-hand side menu, under the "manage" heading, then find your domain in your domain list and click on "manage".
In the resulting module, look for the line that says DNS Information:
At this time, you can choose whether to point just a subdomain (such as blog.yourdomain.com or www.yourdomain.com) to the blog, or the root domain as well ( yourdomain.com ).
  • First, go to the "CNAME" link, and point your subdomain "www", "blog", etc.. at this host: ghs.google.com. (Remember to put that trailing dot "." on there, it's important).
  • If you want to point the root domain as well, under the "A" link (hostnames), remove any current record for the '@' host (such as PARKED) and enter the following four IP addresses, 1 per line
216.239.32.21
216.239.34.21
216.239.36.21
216.239.38.21

And that's it. Your blogger / blogspot blog should now be accessible via your own domain name.
If it doesn't work right away, your local DNS resolvers may have old DNS info cached, just wait a bit and try again later. Always feel free to call or email support if a problem persists.

What is a missing files host?

The Quick Answer

  • A missing files host specifies an alternate location to look for your files in case there are broken links.
  • To specify the server, go to the Settings | Publishing tab.
  • This is only available if you use the Custom Domain feature.


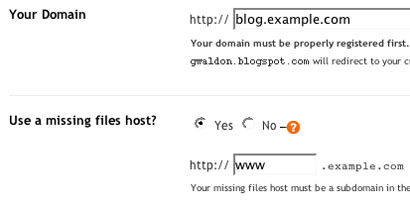
Blogs using our custom domain feature will see an additional option on the Settings | Publishing tab regarding a missing files host:
If you choose to specify a missing files host, it will be used as a fallback server whenever someone tries to access a file that cannot be found on your blog. For example, let's say someone clicks a link towww.yourblog.com/foo.jpg but that file doesn't exist. If you have specified www2.yourblog.comas your missing files host, Blogger will automatically look for a file at www2.yourblog.com/foo.jpgand will try to use that instead.
When you select "yes" for this option, a new field will appear where you can enter the appropriate host. All you have to enter here is a subdomain, which is assumed to be on the same domain as your blog. In the example here, both are on the example.com domain, with the blog using blog as a subdomain, and the missing files host using www.

Why use a missing files host?

The most common use for this feature is when you have a number of images or other files stored on your own FTP server and then you move them to another server. Normally, this would break all the links to these files that are in your blog posts. However, if you use this feature then the broken links will all be redirected to the new location. (Assuming, of course, that the files all keep the same names and locations that they had on the original server.)
This situation may arise if you originally published your blog via FTP and then switched to using custom domain publishing. Images originally posted to your server do not get transferred over to Blogger when you do this, so you may want to move them all to a server such as images.yourdomain.com and use that as your missing files host.


What is a domain name?
If you purchased myownblog.com, then http://myownblog.com is the domain. Your registrar should also provide you http://www.myownblog.com without you having to ask for it. Here www.myownblog.com is an alias or sub domain of myownblog.com domain. These two are different addresses and can point to different places (Web space). For optimization and better search engine ranks, one should redirect one domain to the other so that both the domain and www sub domain ultimately take to one address. For example, you can choose to point myownblog.com to www.myownblog.com. This will take anyone typing http://myownblog.com in browser to http://www.myownblog.com. Normally, you may also opt to point your www alias to main domain, but not if you want to use Blogger’s custom domain facility.

What is CNAME?
CNAME or canonical name is a record which points one sub domain (only) to another. In our case, our www sub domain will point to ghs.google.com, a Blogger sub domain.
Different domain registrars have different ways of getting it done. Log in to your domain provider’s site with your username and password to access your admin panel. Follow the instructions of your registrar to create a CNAME record. With some registrars, you might have to place a request for creating a CNAME entry.
Send this request to your registrar through email or their messaging service, as required. “Please create a CNAME entry for my domain www.myownblog.com pointing to (destination as) ghs.google.com” 

Google’s starter guide on search engine optimization says:
“To prevent users from linking to one version of a URL and others linking to a different version (this could split the reputation of that content between the URLs), focus on using and referring to one URL in the structure and internal linking of your pages.”

Blogger; How to Backup & Restore Blog Posts Using Blogger Import/Export Feature


Blogger has an awesome feature to download and save blog posts on your computer. Of course, you can later restore the posts as well. Additionally, you can also move your posts to some other blogging platform using the export feature or to some other Blogger blog. I'd highly recommend to regularly backup your posts. Check out the instructions to see how to do it.

1- Export or Backup Blog Posts to Your Computer


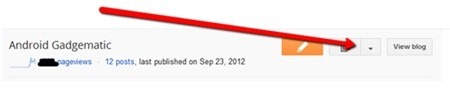
  1. Chose Settings from the list of options. You can press the drop down arrow button to see more options.
  2. In the Settings section, click Other from the left menu.
  3. You'll see 3 options in Blog Tools. Click Export blog. A window will open where you'd have to click the Download Blog button.
  4. An .XML file will be downloaded to your computer. Make sure to give it a proper name and keep it safe. This file will be used to restore your posts later.

2- Import or Restore Blog Posts From Your Computer


  1. Chose Settings from the list of options. You can press the drop down arrow button to see more options.
  2. In the Settings section, click Other from the left menu.
  3. You'll see 3 options in Blog Tools. Click Import blog. A window will open where you'd have to browse the file on your computer & click the Import Blog button.
  4. If you're importing posts from some other blog then make sure that Automatically publish all imported posts is not checked.
  5. Now your posts have been imported or restored.

Listing post titles in alphabetical or chronological order

In this tutorial I will show you how to list the titles of your blog’s 1000 2000 most recent posts. If you are looking for an alternative to Blogger’s Archive gadget, then this might be it. This list can also be used as a Table Of Contents. This list is made possible with the use of Yahoo! Pipe.

See the demo in Blogger Sentral Widget Showcase.

The list comes with several options:

1. List them inside a widget or in a post static page.

2. Arrange the titles in alphabetical or chronological order. If you use your blog as an online serial novel, then chronological order is just what you need.

3. Append (or not) a comment count at the end of each title.

4. Choose numbered or bulleted list style.

Let’s get started,
 <script type="text/javascript">
 var d = new Date();
 var time = d.getHours();
 
 if (time < 10) {
 document.write("<b>Good morning</b>");
 } else {
 document.write("<b>Good day</b>");
 }
 </script>
 

Use this option if you want to put the list on a separate page. (You can then access it via a tab.)

1. Create a new page by going to Posting > Edit Pages and clicking the New Page button.

2. Click Edit HTML tab to switch to HTML mode.

3. Copy and paste the code into the editor.

4. Click Post Options at the bottom of the editor. Under the Edit HTML Settings heading, select Ignore newlines.


5. Publish and view your post . The list should appear inside the page.

6. Then add a link to the page from your homepage. This can be done by adding navigation tabs. If you have the page gadget installed, this is added automatically by Blogger.

7. If you want to remove the extras (sidebars, footer etc.) from the page, read Apply different layout/styling to static pages.

3) Put the list in a gadget

Use this option if you want to put the list on a sidebar, making it visible at all times.

1. Go to Design > Page Elements.

2. Click Add A Gadget link.

3. Select HTML/Javascript gadget.

4. Enter the title of your widget e.g. All Posts List.

5. Copy and paste the code inside the content box.

Replace http://www.bloggersentral.com (the value of YourBlogUrl) in code line 20 with your own blog URL. Do not include the trailing slash (as in .com/). Refer to step 4 for options/customizations.

Reminder: In the process of editing your code, never switch to Rich Text mode. Doing so will add line breaks (
) in your code, rendering the code useless.

6. Save and view your blog.


4) Customizing the list

Below are a few available customizations/options:

§ Listing order -the default order is alphabetical. To change to chronological order, just change the word alphabet in code line 21 to chrono.

§ Comment count - comment count is displayed by default. To remove comment count, delete code line 13.

§ List style -the default is bulleted list. To change to numbered list, replace ul (in line 4 and 16) with ol.

§ Style the list with the inline style attribute in line 4.

§ If your list becomes too long, you might want to put it in a scroll box


5) Editing the pipe (optional)

If you want further customize the widget output, you need to edit the (Yahoo) pipe itself. Follow the steps below:

1. Go to the Yahoo! pipe.

2. Log in to your Yahoo! account.

3. Create a clone by clicking the Clone button.

4. Click edit source to edit it in anyway you like.

5. When you’re done editing and saving, test run it by clicking Run Pipe button to confirm the output of the pipe.

6. To use your edited pipe, copy the pipe id and paste it to replace the existing id in line 22. (To get the id, look in your browser’s address bar. The id is the end part the URL when you are viewing or editing the pipe.)

Enjoy!

EXCLUSIVE CURSORS FOR BLOGGER


One of the best way to make your blog good looking and interesting is by changing the mouse cursor. Below are 15 exclusive cursors for blogger that can be applied to your blog. Today i will teach you how to change your cursor in blog. It's an easy method which a begginer blogger can also do.
Follow the Below steps:
  1. Login to dashboard.
  2. Go to Templates---> Edit Html.
  3. Tick on Expand Widget Templates.
  4. Find for </head> tag.
  5. Copy and paste any cursor from below above/before the closing </head> tag.


Cursor.1
<style type="text/css">body, a:hover {cursor: url(http://safir85.ucoz.com/bdlab-blogspot/Arrow_02.gif), progress;}</style><a href="http://blog-toolz.blogspot.com" target="_blank" title="Blogger Widgets"><img src="" border="0" alt="Blogger Widgets" style="position:absolute; top: 0px; right: 0px;" /></a>


Cursor.2
<style type="text/css">body, a:hover {cursor: url(http://safir85.ucoz.com/bdlab-blogspot/bluemultiglit.gif), progress;}</style><a href="http://blog-toolz.blogspot.com" target="_blank" title="Blogger Widgets"><img src="" border="0" alt="Blogger Widgets" style="position:absolute; top: 0px; right: 0px;" /></a> 


Cursor.3
<style type="text/css">body, a:hover {cursor: url(http://safir85.ucoz.com/bdlab-blogspot/tail2.gif), progress;}</style><a href="http://blog-toolz.blogspot.com" target="_blank" title="Blogger Widgets"><img src="" border="0" alt="Blogger Widgets" style="position:absolute; top: 0px; right: 0px;" /></a> 


Cursor.4
<style type="text/css">body, a:hover {cursor: url(http://safir85.ucoz.com/bdlab-blogspot/bounce.gif), progress;}</style><a href="http://blog-toolz.blogspot.com" target="_blank" title="Blogger Widgets"><img src="" border="0" alt="Blogger Widgets" style="position:absolute; top: 0px; right: 0px;" /></a> 


Cursor.5
<style type="text/css">body, a:hover {cursor: url(http://safir85.ucoz.com/bdlab-blogspot/apple-tmani.gif), progress;}</style><a href="http://blog-toolz.blogspot.com" target="_blank" title="Blogger Widgets"><img src="" border="0" alt="Blogger Widgets" style="position:absolute; top: 0px; right: 0px;" /></a> 


Cursor.6
<style type="text/css">body, a:hover {cursor: url(http://safir85.ucoz.com/bdlab-blogspot/aliendance.gif), progress;}</style><a href="http://blog-toolz.blogspot.com" target="_blank" title="Blogger Widgets"><img src="" border="0" alt="Blogger Widgets" style="position:absolute; top: 0px; right: 0px;" /></a> 


Cursor.7
<style type="text/css">body, a:hover {cursor: url(http://safir85.ucoz.com/bdlab-blogspot/banana-dance-ani.gif), progress;}</style><a href="http://blog-toolz.blogspot.com" target="_blank" title="Blogger Widgets"><img src="" border="0" alt="Blogger Widgets" style="position:absolute; top: 0px; right: 0px;" /></a> 


Cursor.8
<style type="text/css">body, a:hover {cursor: url(http://safir85.ucoz.com/bdlab-blogspot/Bird_3.gif), progress;}</style><a href="http://blog-toolz.blogspot.com" target="_blank" title="Blogger Widgets"><img src="" border="0" alt="Blogger Widgets" style="position:absolute; top: 0px; right: 0px;" /></a> 


Cursor.9
<style type="text/css">body, a:hover {cursor: url(http://safir85.ucoz.com/bdlab-blogspot/blackglitter.gif), progress;}</style><a href="http://blog-toolz.blogspot.com" target="_blank" title="Blogger Widgets"><img src="" border="0" alt="Blogger Widgets" style="position:absolute; top: 0px; right: 0px;" /></a> 


Cursor.10
<style type="text/css">body, a:hover {cursor: url(http://safir85.ucoz.com/bdlab-blogspot/cat-ani-brown.gif), progress;}</style><a href="http://blog-toolz.blogspot.com" target="_blank" title="Blogger Widgets"><img src="" border="0" alt="Blogger Widgets" style="position:absolute; top: 0px; right: 0px;" /></a> 


Cursor.11
<style type="text/css">body, a:hover {cursor: url(http://safir85.ucoz.com/bdlab-blogspot/fireblue.gif), progress;}</style><a href="http://blog-toolz.blogspot.com" target="_blank" title="Blogger Widgets"><img src="" border="0" alt="Blogger Widgets" style="position:absolute; top: 0px; right: 0px;" /></a> 


Cursor.12
<style type="text/css">body, a:hover {cursor: url(http://safir85.ucoz.com/bdlab-blogspot/Fly_2.gif), progress;}</style><a href="http://blog-toolz.blogspot.com" target="_blank" title="Blogger Widgets"><img src="" border="0" alt="Blogger Widgets" style="position:absolute; top: 0px; right: 0px;" /></a> 


Cursor.13
<style type="text/css">body, a:hover {cursor: url(http://safir85.ucoz.com/bdlab-blogspot/Halloween_2.gif), progress;}</style><a href="http://blog-toolz.blogspot.com" target="_blank" title="Blogger Widgets"><img src="" border="0" alt="Blogger Widgets" style="position:absolute; top: 0px; right: 0px;" /></a> 


Cursor.14
<style type="text/css">body, a:hover {cursor: url(http://safir85.ucoz.com/bdlab-blogspot/Heart.gif), progress;}</style><a href="http://blog-toolz.blogspot.com" target="_blank" title="Blogger Widgets"><img src="" border="0" alt="Blogger Widgets" style="position:absolute; top: 0px; right: 0px;" /></a> 


Cursor.15
<style type="text/css">body, a:hover {cursor: url(http://safir85.ucoz.com/bdlab-blogspot/horse-ani1.gif), progress;}</style><a href="http://blog-toolz.blogspot.com" target="_blank" title="Blogger Widgets"><img src="" border="0" alt="Blogger Widgets" style="position:absolute; top: 0px; right: 0px;" /></a> 

Fixed Position Independence Day/ Welcome Note/ Your Name etc BANNER For BLOGGER


It's time for another gadget to add some Independence Day cheers to your blog.In this post i have a stylish Happy Independence India Banner you can fix in the top right corner of your blog to greet your readers.The banner is transparent so it wont block your content and as the reader scrolls the banner followers them.A great simple way to wish your readers a Happy Independence Day.
Steps To Add This Stylish Banner To Blogger

Login to Your Dashboard.
Go to Templates >>Edit Html.
Find for </head>
Paste the below code there before </head>.

<style>
.independence {
position: fixed; top: 0%; right: 0%;
zoom:1;
-webkit-transition:all 0.3s ease-in-out;
    -moz-transition:all 0.3s ease-in-out;
    -ms-transition:all 0.3s ease-in-out;
    -o-transition:all 0.3s ease-in-out;

}
.independence:hover {
position: fixed; top: 0%; right: 0%;
zoom:1.3;
}
</style>
<img class='independence' title='Happy Independence Day To My Fellow Indians' alt="Blog Tips" src=" https://blogger.googleusercontent.com/img/b/R29vZ2xl/AVvXsEg-6w5AbWpGyWaYOVTuXVJXLZ5SEIEXp0qsDCxYVce7eiQ-5f8WCmyE_wD5SdJj1qNm8xHQWYEXkpahQm086Of-O41LnfB3o9TpmmTBz1XDv3obK7-UeJUymc_5mNQauLlCD-VXZx_pv8E/s218/happyindependenceday-1.png "/>


Now, click on Save the Template.

How To Remove Blogger Attribution Gadget

The Attribution gadget is the gadget in the footer that says "Powered By Blogger". If you have tried to remove this then you may of noticed this gadget is locked into you blog. To unlock it, follow the next steps:

Step 1. Log in to your Dashboard, go to >> Design >> Edit HTML

Step 2. Check the "Expand Widget Templates" box

Step 3. Search (CTRL+ F) for this code:


<b:widget id='Attribution1' locked='true' title='' type='Attribution'>

Step 4. Replace true with false


Step 5. Save Template

Now attribution gadget is unlocked and it can be removed. Just go to:


Design >> Page Elements, click on the edit link from Attribution gadget:


Then click on the Remove button - as you can see in the screenshot below:

How to Add Cool Floating Notification bar in Blogger

We already shared a floating notification bar for wordpress recently. Many of my readers request to create this floating notification bar for Blogspot/Blogger blogs and today we are sharing a simple yet Cool Floating Notification bar for Blogger. Its very easy to add this widget in blogspot. All you have to do is copy code given below, paste it in to your blog and customize text, link etc according to your needs. Isn’t that simple!


Add Cool Floating Notification bar in Blogger ! 
First Always Back Up Your Template Before You Any Make Changes – How To Back Up A Blogger Template
Goto Blogger => Design => Edit HTML
Next search for this code
    <body>

    Just below it paste the following code,

    <!-- Notification code start -->
    <style type='text/css'>
    #ut-sticky
    {
    background: #7d7e7d; /* Old browsers */
    background: -moz-linear-gradient(top,  #7d7e7d 6%, #7d7e7d 9%, #0e0e0e 99%); /* FF3.6+ */
    background: -webkit-gradient(linear, left top, left bottom, color-stop(6%,#7d7e7d), color-stop(9%,#7d7e7d), color-stop(99%,#0e0e0e)); /* Chrome,Safari4+ */
    background: -webkit-linear-gradient(top,  #7d7e7d 6%,#7d7e7d 9%,#0e0e0e 99%); /* Chrome10+,Safari5.1+ */
    background: -o-linear-gradient(top,  #7d7e7d 6%,#7d7e7d 9%,#0e0e0e 99%); /* Opera 11.10+ */
    background: -ms-linear-gradient(top,  #7d7e7d 6%,#7d7e7d 9%,#0e0e0e 99%); /* IE10+ */
    background: linear-gradient(top,  #7d7e7d 6%,#7d7e7d 9%,#0e0e0e 99%); /* W3C */
    filter: progid:DXImageTransform.Microsoft.gradient( startColorstr=&#39;#7d7e7d&#39;, endColorstr=&#39;#0e0e0e&#39;,GradientType=0 ); /* IE6-9 */
     
    border-bottom:2px solid #999;
     
    color:#fff;
    text-align: center;
    margin:-12px auto;
    padding-bottom:1px;
    border-top: 1px solid #333;
    height:38px;
    font-size:13px;
    position:fixed;
    vertical-align: baseline; overflow:hidden;
    z-index:999;
    width:100%;
    border-bottom-left-radius:6px;
    border-bottom-right-radius:6px;
    display:block;
    font-weight: bold;
    font-family: arial,&quot;Helvetica&quot;;
    font-color:#fff;
     -moz-box-shadow: 0 2px 4px hsla(0,0%,0%,.35);
     -webkit-box-shadow: 0 2px 4px hsla(0,0%,0%,.35);
    }
    #ut-sticky:hover
    {
     
    background-color:#333;background-image:-moz-linear-gradient(top,#555555,#434343);background-image:-ms-linear-gradient(top,#555555,#434343);background-image:-webkit-gradient(linear,0 0,0 100%,from(#555555),to(#434343));background-image:-webkit-linear-gradient(top,#555555,#434343);background-image:-o-linear-gradient(top,#555555,#434343);background-image:linear-gradient(top,#555555,#434343);background-repeat:repeat-x;filter:progid:DXImageTransform.Microsoft.gradient(startColorstr=&#39;#555555&#39;,endColorstr=&#39;#434343&#39;,GradientType=0)
     
    -webkit-transition:all 1.3s ease-in-out;-moz-transition:all 1.3s ease-in-out;-o-transition-duration:all 1.3s ease-in-out;transition:all 1.3s ease-in-out;
     
     -moz-box-shadow: 0 2px 4px hsla(0,0%,0%,.35);
     -webkit-box-shadow: 0 2px 4px hsla(0,0%,0%,.35);
     
    }
     
    #ut-button {background:#fff; padding:4px; color:black;text-shadow:0 -1px 0 rgba(255,255,255,0.25);background-color:white}
     
    #ut-sticky p{line-height:5px; font-size:13px; text-align:center; width:95%; float:left;}
    #ut-sticky p a{ text-decoration:underline; padding:4px; color:#FFFF33;}
    .ut-cross{display:block; position:relative; right:15px; top:4px;float:right;}
    .ut-cross a{font-size:18px; font-weight:bold; font-family:&quot;Arial&quot;; color:#FF0000; line-height:30px;}
    .ut-cross, a:hover{color:#DDD; text-decoration:none;}
     
    </style>
    <div id='ut-sticky'>
    <p style='padding-top:17px;'>Add This Floating Notification Bar To Your Blog <a class='ut-button' href='http://www.allbloggingtips.com' target='_blank'>Click Here!</a></p>
    <div class='ut-cross'><a href='javascript:hide_cross();'>X</a></div>
    </div>
    <script language='JavaScript'>
    function hide_cross() {
    crosstbox = document.getElementById(&quot;ut-sticky&quot;);
    crosstbox.style.visibility = &#39;hidden&#39;;
    }
    </script>
    <br/><br/>
    <br/><br/>
    <!-- End of Notification code, info - http://www.allbloggingtips.com -->


    To Customize it
    After adding above code just edit above HIGHLIGHTED text and link to your desire text.

    I hope you enjoyed this cool Floating Notification bar widget. Do let me know if you face any problem.