

NI LabVIEW code performance is influenced by numerous factors, including the environment configuration, hardware specifications, code architecture, and algorithm efficiency. Thanks to significant investment, the LabVIEW compiler has many transforms and optimizations under the hood, which automatically eliminate unnecessary overhead and use unique hardware capabilities like multicore processors and DMAs to increase performance. However, it may occasionally be necessary to improve the performance of a LabVIEW application in a key area. Some performance bottlenecks require significant modifications to the code architecture, which can be a time-consuming and difficult task, but many LabVIEW applications can take advantage of simple tips and tricks to improve performance and eliminate unnecessary overhead in key areas. This article looks at some examples using a combination of programming constructs and environmental settings.
Benchmarking is the first and most important step toward improving performance. It helps identify the exact locations of the biggest bottlenecks in the software. The easiest and most straightforward way to measure execution time is to compare the processor tick count before and after a certain operation using the Tick Count function. This was the methodology used to assess the effectiveness of all the following techniques.

Updating large numbers of UI elements in a short time period may require rerendering the front panel an unnecessary number of times, which requires additional CPU cycles and can ultimately slow overall application performance. A common culprit is a tree control populated with thousands of items, which can take several seconds to update. Obtain a reference to the front panel, and then set the Defer Panel Updates property of the panel class to “true” before beginning such an operation. When complete, set the value of this property back to “false” to update the front panel.
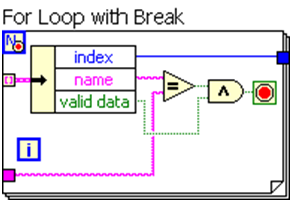
While Loops typically perform an unbounded number of operations, which requires dynamic allocation of memory as the algorithm executes. For Loops, however, have a predetermined maximum number of iterations. If a While Loop operates on a finite dataset, you can eliminate this additional overhead by replacing it with a For Loop with the Conditional Terminal enabled. To enable this functionality, right-click a For Loop and select “Conditional Terminal.”
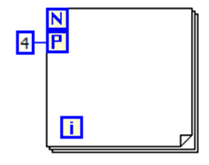
Algorithms that require iterating through a large dataset can sometimes be divided for parallel execution. Parallelizing a computationally intensive algorithm makes it possible for separate cores to iterate through the data at the same time, which can reduce overall execution time significantly. To discover For Loops in your code that can be parallelized, select Tools > Profile > Find Parallelizable Loops. As a general rule, you want to parallelize only top-level For Loops, as parallelizing nested For Loops (that is, For Loops within other loops) can add significant processing overhead to your application.
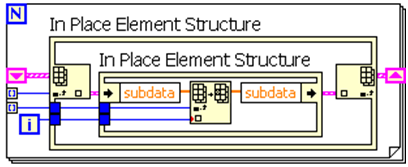
As a general rule, you typically make memory copies when a wire is branched on the block diagram. There are many caveats to this, as the LabVIEW compiler identifies where memory can be reused to eliminate unnecessary copies. However, the In-Place Element Structure, which was introduced in LabVIEW 8.5, explicitly tells the compiler to operate on the data in-place, thereby guaranteeing that a copy is not made. Keep in mind that this optimization is unnecessary for very small datasets or individual numbers.
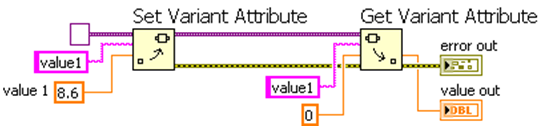
Many applications require that large datasets be stored such that individual elements can quickly be retrieved using a unique identifier—this is commonly known as a lookup table, hash table, or map. A simple array is often used for this purpose, but retrieving a value can be an inefficient process, as it requires a linear search through the array. In LabVIEW, the variants use a highly optimized lookup table under the hood for specifying and retrieving attributes, making it an ideal tool for implementing a lookup table. Simply use the Get Variant Attribute and the Set Variant Attribute to store and retrieve paired values.

The operation of adding multiple values to the front of an array incurs the overhead of rearranging memory to accommodate each new element. You can avoid this overhead by flipping the array first using the Reverse 1D Array function, adding the new elements to the back, and then reversing the array again when complete. Adding elements to the end of the array is more efficient because LabVIEW has already allocated additional memory beyond the original size to accommodate appending values, and the reverse operation merely moves a pointer to the array from the beginning to the end.
If these tips do not sufficiently address problems with performance, you may want to consider modifying or changing the way key components of your code are written. For example, make certain that processes have been appropriately divided into separate loops to ensure that unrelated operations are not blocking or slowing down other parts of an application. In general, well-designed LabVIEW applications should require only minimal tweaks to achieve optimal execution performance.
No comments:
Post a Comment